Sprouting seeds is a simple and rewarding process that allows you to grow your own nutritious sprouts at home.
To sprout seeds, rinse them well and soak them in water for the recommended time specific to each seed type. Drain the water, transfer the seeds to a sprouting tray or container, and rinse them regularly until they develop sprouts, typically within a few days to a week depending on the seed.
Whether you’re interested in adding fresh sprouts to your salads, sandwiches, or smoothies, or you want to explore the world of sprouting for its health benefits, this step-by-step guide will walk you through the process of sprouting seeds successfully.
How to Sprout Seeds: Step-by-Step Guide
Sprouting seeds is a popular practice that dates back centuries. It involves germinating seeds until they develop into young plants with edible shoots. Sprouts are known for their high nutritional value and are packed with vitamins, minerals, and enzymes. They are a great addition to a healthy diet and can be easily grown at home with minimal equipment.
Choosing the Right Seeds for Sprouting
Not all seeds are suitable for sprouting. It’s important to choose seeds that are specifically labeled for sprouting to ensure they are free from any chemicals or treatments that may hinder the sprouting process.
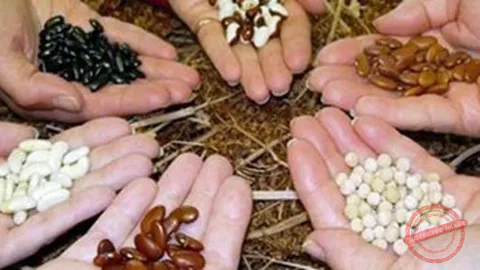
Popular choices for sprouting include mung beans, alfalfa seeds, broccoli seeds, and lentils. Organic, non-GMO seeds are recommended for the best results.
Soaking the Seeds
Before starting the sprouting process, it’s crucial to soak the seeds. Soaking helps to break down the seed coat and kickstart the germination process. Place the seeds in a clean container and cover them with filtered water.
The seeds should be soaked for a specific duration, depending on the type of seed. Refer to the instructions on the seed package for the recommended soaking time.
Selecting the Sprouting Method
There are several methods you can choose from when sprouting seeds, including sprouting in a jar, a tray or sprouter, or in soil. Each method has its own advantages, and the choice depends on personal preference and the type of seeds being sprouted. Let’s explore each method in detail.
Sprouting in a Jar
Sprouting in a jar is a popular and simple method that requires minimal equipment. Follow these steps to sprout seeds using this method:
Step 1: Preparing the Jar
Select a wide-mouthed glass jar and ensure it’s clean. You can use a mason jar or any other jar with a mesh or sprouting lid. Sterilize the jar if necessary to prevent the growth of harmful bacteria.
Step 2: Soaking the Seeds
Measure the desired amount of seeds according to your needs and the jar’s capacity. Rinse the seeds thoroughly and place them in the jar. Add enough water to cover the seeds, and let them soak for the recommended duration.
Step 3: Rinsing the Seeds
After soaking, drain the water from the jar using the sprouting lid or a fine mesh sieve. Rinse the seeds with fresh water and drain again. Repeat this rinsing process two to three times a day to keep the seeds clean and hydrated.
Step 4: Draining the Water
Ensure the jar is positioned at an angle to allow any excess water to drain out completely. The sprouts should not sit in stagnant water, as this can lead to mold or bacterial growth.
Step 5: Sprouting Process
Place the jar in a well-lit area, away from direct sunlight. The seeds will begin to sprout within a few days. Continue rinsing and draining the sprouts two to three times a day to promote healthy growth.
Step 6: Rinsing and Draining
Maintain the rinsing and draining process until the sprouts have reached the desired length. This typically takes around 4-7 days, depending on the seed variety. Ensure the sprouts are always moist but not waterlogged.
Step 7: Harvesting the Sprouts
Once the sprouts have reached the desired length, give them a final rinse. Drain off any excess water and harvest the sprouts. Use kitchen shears or simply pluck them from the jar. Rinse the sprouts one last time before consuming or storing them.
Sprouting in a Tray or Sprouter
Another popular method for sprouting seeds is using a tray or sprouter. Here’s how to sprout seeds using this method:
Step 1: Preparing the Tray or Sprouter
Select a sprouting tray or sprouter designed for this purpose. Ensure it’s clean and sterilized. Place a layer of moistened paper towel or a piece of cheesecloth at the bottom of the tray to prevent the sprouts from falling through.
Step 2: Soaking the Seeds
Measure the desired amount of seeds and rinse them thoroughly. Soak the seeds according to the recommended duration in the seed package.
Step 3: Spreading the Seeds
Spread the soaked seeds evenly on the tray, making sure they are not too crowded. This allows room for proper growth and prevents the sprouts from becoming entangled.
Step 4: Rinsing and Draining
Place the tray or sprouter in a location with good airflow. Rinse the seeds gently with fresh water two to three times a day, ensuring they remain moist. Allow the excess water to drain out completely after each rinse.
Step 5: Sprouting Process
The seeds will begin to sprout within a few days. Continue the rinsing and draining process to promote healthy growth. Ensure the sprouts are not sitting in standing water, as this can lead to mold or bacterial growth.
Step 6: Harvesting the Sprouts
Once the sprouts have reached the desired length, give them a final rinse. Drain off any excess water and harvest the sprouts. Carefully remove them from the tray or sprouter and rinse them one last time before using or storing.
Sprouting in Soil
Sprouting seeds in soil is another method that allows for more substantial growth. Here’s how to sprout seeds using this method:
Step 1: Preparing the Soil
Choose a container or pot with drainage holes and fill it with a suitable potting soil mix. Moisten the soil without making it too soggy.
Step 2: Soaking the Seeds
Measure the desired amount of seeds and rinse them thoroughly. Soak the seeds according to the recommended duration in the seed package.
Step 3: Planting the Seeds
Create shallow holes or furrows in the soil and gently place the soaked seeds, spacing them evenly. Cover the seeds with a thin layer of soil and lightly press down.
Step 4: Watering and Caring for the Sprouts
Water the soil gently to keep it consistently moist, but avoid overwatering. Place the container in a well-lit area, away from direct sunlight. Ensure the sprouts receive adequate ventilation.
Step 5: Harvesting the Sprouts
As the sprouts grow, continue to water them as needed. Once they have reached the desired length, gently harvest the sprouts by cutting them above the soil level. Rinse the sprouts thoroughly before using or storing.
Tips for Successful Sprouting
- Always use clean equipment and rinse seeds thoroughly before sprouting.
- Follow the recommended soaking and rinsing times for each type of seed.
- Maintain proper hygiene to prevent contamination and mold growth.
- Choose high-quality, organic seeds for the best results.
- Ensure the sprouts receive adequate airflow and are not overcrowded.
- Store sprouts in the refrigerator in a sealed container to maintain freshness.
- Consume sprouts within a few days to maximize their nutritional value.
Can I sprout any type of seed?
Not all seeds are suitable for sprouting. It’s best to choose seeds specifically labeled for sprouting to ensure success.
How long does it take to sprout seeds?
The sprouting time varies depending on the type of seed, but most sprouts are ready for harvest within 4-7 days.
Can I use tap water for rinsing the seeds?
It’s recommended to use filtered or purified water to rinse the seeds to avoid any potential contaminants.
Can I eat sprouts raw?
Yes, sprouts can be consumed raw and are a delicious addition to salads, sandwiches, and other dishes.
Are there any safety considerations when sprouting seeds?
It’s important to maintain proper hygiene, rinse seeds thoroughly, and avoid sprouting seeds that are past their expiration date to minimize the risk of foodborne illnesses.
Conclusion
Sprouting seeds at home is a rewarding and easy process that allows you to enjoy fresh and nutrient-rich sprouts. By following the step-by-step guide outlined above, you can successfully sprout seeds using various methods such as sprouting in a jar, a tray or sprouter, or in soil. Experiment with different seed varieties and incorporate sprouts into your diet for added health benefits and culinary delights.


