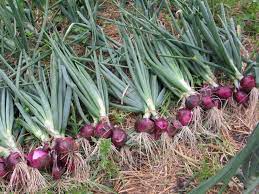
Onion production in Zimbabwe is one of the most lucrative farming venture anyone can engage. Onions are used for varieties of delicacies and spicy.
The total demand of onions to supply in Zimbabwe are usually not meant, on this note, there is need for more hands and more farmers to look into this farming area and commercialize it.
To start growing onions in Zimbabwe, you will need a good cultivar of onions, fertilize soil with low water retention, knowledge skill of growing onions, nursing the seedlings and finally transplanting to the bed you have prepared on your farmland.
So, let us get our hands dirty on how you can start farming onions in Zimbabwe and all you need to know.
How To Grow Onions In Zimbabwe Step By Step Guide
Follow this guide carefully to start farming onions in Zimbabwe;
Step 1: Select your farming site
Onions prefer an open location with 6-8 hours of direct sunlight per day. They are cool-season plants whose development is temperature-dependent.
They prefer cool temperature in the beginning stages of their growth and warm weather when developing bulbs.
Read Also: How To Start Farming With No Money {Beginners Guide}
Onions are typically a winter crop in regions with moderate winters. Plant later to prevent bolting if you are in a cooler region.
Depending on whether seed or sets are planted, onions are normally harvested 18 to 42 weeks after sowing, depending on whether they are grown from seed or sets.
[irp]
The soil is another crucial component for a successful onion harvest. The optimal soil for onion cultivation is moderately fertile, well-drained, rich, loose soil. Onions demand a pH range between 6.0 and 6.8 and cannot thrive in acidic or wet soil.
Read Also: How To Start Farming Business In Zimbabwe [Beginners Guide]
Before you begin production, test the pH of the soil. To conduct a soil test, a representative soil sample must first be collected. Learn here how to take a soil sample properly.
Send the material to your testing laboratory or a nearby research institution, such as the Kutsaga Research Board.
You will receive an examination of your soil’s nutrients and pH level, which will be either alkaline (high pH), acidic (low pH), or neutral (just right).
After receiving the results of your soil test, you can amend or change the pH of your soil in accordance with the results.
If your soil is excessively acidic (low pH), you will need to add lime, such as dolomitic limestone, to bring it closer to the optimal pH level.
[irp]
If the soil is excessively alkaline (high pH), you can neutralize it by adding peat moss or compost on a routine basis.
Step 2: Land Preparation for Onion Cultivation

It is not advisable to plant onions or other members of the onion family (allium) in the same location year after year. leeks, Garlic, scallions, shallots, cucumbers, zucchini, and summer and winter squashes are members of the onion family.
Growing plants from the allium family in the same location year after year will lead to the accumulation of diseases, such as nematodes. Plan crop rotation to prevent this.
[irp]
Prepare the soil approximately one month before planting. To prepare your grounds for onion cultivation, eliminate weeds and stones. Fine-tune the soil’s texture.
The final plough should incorporate a 5-10cm layer of organic matter, such as high-quality compost or aged manure (4 months or older). Organic matter will aid in the retention of nutrients and moisture in the soil.
Build planter boxes that are 100cm wide (typical size); nevertheless, certain box sizes may vary. Multiple rows will be planted in the bed.
Before planting, rake Compound S fertilizer into your beds at the rate specified on the container to promote root development and early bulb production. Cover the area with 5cm of new dirt.
Step 3: Planting
There are three ways to plant onions: from seed, small bulbs called sets, or transplants. Seeds offer a wider variety of plant types, but they are time-consuming.
When the growing season is brief, sets are important because they are simpler to cultivate.
[irp]
Sowing onion seeds in trays: Sow seeds in flats or cell packs in February-March, and then transplant seedlings into the field 6-8 weeks prior to transplanting.
Sowing seed outside in seedbeds: To sow seed directly into the soil in regions with extended and warm growing seasons. Ensure that you have added compost that has fully decomposed, followed by an all-purpose fertilizer.
Outlined Below Are The General Seed-Planting Procedures:
- Make seed bed 1 meter wide by 5 meters long Rake soil level to form a uniform layer.
- To sow onion seeds along a straight line, mark the ground with a thread held taut by two pegs.
- Then, between the pegs, drive a stake or broom handle into the earth to create sowing drills. Planting in a straight line facilitates post-germination watering and weeding.
- If the drill’s bottom is dry, softly wet it.
- The seed packet will inform you how deep the drills should be: “onion seeds are planted shallowly, roughly 1.2 centimeters deep.”
- Cover by carefully bringing soil back to fill the hole, then gently compact the soil with the rake’s back.
- Utilize a light mist when watering to prevent the seed from being dislodged. Whenever the surface of the seed bed is dry, water it.
- Cover your seed bed with a floating row cover, which is a light, woven fabric. This will keep insects from getting to your young seedlings.
- You can get viable seeds from a respected vendor such as National Tested Seeds.
Planting onion sets:
A set onion is a little onion bulb that is incapable of flowering when exposed to cold. It has already undergone one step of bulbing. Sets generate bulbs more quickly than growing from seed. They are simply referred to as red, white, or yellow onions.
The following are the steps to plant sets:
- Create a hole in the earth that is 2 cm deep. To maintain it straight, drag the edge of a hoe along a string kept taut by two pegs driven into the ground.
- In 30cm-wide rows, space plants 10cm apart.
- Each bulb should be pressed firmly into the soil and buried so that just its tip is visible above the dirt. Use a row cover to repel birds and warm the soil.
- The only time plants require significant amounts of water is during dry spells.
- Using this method, onions can be harvested anywhere between 18 and 42 weeks after planting/sowing.
Onion transplants: a transplant is typically an 8- to 10-week-old onion plant that has not yet produced a bulb. They provide you an advantage throughout the lengthy onion-growing season. Make sure the transplants are healthy, disease-free, and have a pencil-sized neck diameter. Pre-irrigate fields before transplanting.
Transplant seedlings approximately 2.5 centimeters deep in moist soil and 8 to 10 centimeters apart in rows on 100-centimeter-wide raised beds; bed sizes may vary. Multiple rows are planted. Your choice of irrigation will determine the amount of rows you plant.
You may purchase seedlings from a reputable nursery, such as Emerald Seedlings or Seed ridge.
Step 4: Fertilizing your onions farm
To produce large bulbs, onions are voracious eaters and require continual feeding. Soil analysis must inform the application of fertilizer. Based on the test results, add any missing nutrients.
Utilize fertilizer at the time of planting and apply nitrogen-rich side dressings (additional nutrients) every two to three weeks once bulb formation has begun. About 113 kg of nitrogen are required per acre.
Be cautious to keep fertilizer away from foliage and bulbs. Apply adjacent to the onion rows, then cover with soil. water soon following feeding
Late in the season, when necks are soft and tops are beginning to collapse, fertilizer is no longer necessary.
On a regular basis, you can incorporate organic matter into the soil. This may be well-rotted compost or animal dung, both of which are rich in a variety of nutrients.
Step 5: Irrigate your onions farm
During germination, onion seeds should be maintained moist and not allowed to dry out. Watering is essential throughout the early phases of plant growth, when establishing transplants and producing bulbs.
Drip irrigation can assist in delivering moisture straight to the roots after germination, without wetting the leaves, which can induce powdery mildew.
Keep onions wet with water at a pace of around 1″ each week. Using a drip irrigation system, you will likely water your plants approximately twice each week. Depending on the soil, climate, precipitation, and growth stage of the plant, the rate may vary.
Due to their shallow root systems, onion plants must be thoroughly hydrated during dry periods. They may split if allowed to dry out.
Also, do not overwater your onion plants, since this will decrease their shelf life. If leaves begin to yellow, you may be overwatering your plants.
Stop watering after the plant’s leaves begin to fall and become brown, and allow to dry before harvesting. Using timers and sensors, you can know how much water your onions require.
Step 6: Weed your farm regularly
During the first several weeks of onion growth, when the plants are still young, weeds can easily overwhelm the crop.
Their lengthy growing seasons allow for more weed growth possibilities. To prevent competition for water, nutrients, and light, which inhibits bulb formation, weed control is essential. Insects and diseases can also thrive in weeds.
Plan to remove weeds when they are still little. Carefully remove weeds by hand so as not to harm bulbs or disturb their soil placement. To suppress weeds and conserve moisture, mulch around plants with a layer of straw or wood chips.
Additionally, you can research registered herbicides for pre-emergence weed control prior to planting.
Step 7: Harvesting & Storing Your Onions
When to harvest onions: Onions should be harvested at their peak ripeness. The ripeness of an onion can be determined by pinching its neck. The necks of immature onions are rigid, whereas those of adult onions are soft and flexible.
When fifty percent of plant leaves have fallen over and died back, onion plants are also ready to be harvested. Stop watering at this location. Harvest before the leaves totally dries out.
To harvest, carefully loosen the bulbs from the soil with a garden fork or by hand, then remove each bulb by its neck. Care should be taken to avoid crushing or destroying bulbs.
Allow the bulbs to dry in the sun for a few days on top of the soil. To prevent sun scalding of the onions, place the tops of one row over the bulbs of another row.
The tops of onions are cured when they are completely dry. Once the outer skins are completely dry, remove any loose dirt and gently knock off the tops.
If rain is forecast, plants should be cured under cover. Cure onion bulbs in a cool, dry, well-ventilated shed for two to three weeks. After curing, cut 1 inch from the tops of the bulbs and store them in a cool, dry, and airy location. Use caution to prevent bruising.
Depending on the storage conditions, short-day cultivars can last for many weeks or even longer if they are harvested with care and stored for an extended period.
To allow airflow, store dried bulbs in netting or orange mesh bags. Place the onions in a cold, dry, and well-ventilated shed or area. Handle them with care and avoid dropping them to prevent damage and bruises.
The best onion storage conditions are 0 degrees Celsius and 60-70 percent humidity. To prevent or reduce post-harvest losses, keep the storage area clean, cool, and humid.
General Farming Principle For Farming Onions
Select an onion cultivar that thrives in your region. All agriculture is local!
Rotate your crops annually to prevent a buildup of fungal spores on onions.
Purchase disease-resistant seeds from a trusted vendor. When purchasing sets, ensure that they are not infected. Additionally, problems can be mitigated by maintaining adequate airflow around your plants by broad spacing.
Remove and dispose of any infected or problematic plants. This will assist avoid the spread of sickness.
Maintain beds clear of weeds. Mulching and hand weeding efficiently manage the majority of weed species.
Utilize row covers to encourage seedlings to create the most strong plants possible prior to the onset of bulb production, which is triggered by the lengthening of the days.
Keep plants moist and avoid overwatering.
Plant onions in soil with enough drainage, and minimize overcrowding.
After using gardening equipment (for planting, weeding, and harvesting), clean them and wash your clothing.
Chemical controls should only be used as a last resort.
How To Market Your Onions
Fresh onions can be sold at a market such as Mbare Musika. Fresh market prices fluctuate according on the market’s supply and demand.
Keep an eye on market prices to prevent selling your onions too cheaply at the market or to middlemen.
Additionally, you can sell your onions in bulk or to retail shops like Pick n Pay for fresh consumption.
Other marketing channels include restaurants, schools, and hospitals. Start conversing with buyers to determine their purchasing requirements.
Other onion buyers are processors. They purchase onions for use in condiments, sauces, and soup. You can meet their volume requirements by combining your supply with other onion farmers.
You can even sell your onions directly to clients from the bed of a pickup truck along the side of the road. Other choices include selling through classified ads. Be inventive!
How Long Do Onions Take To Grow In Zimbabwe?
Usually, onions reach maturation and harvesting stage at about 90 to 150 days after transplanting.
Is Onion Profitable In Zimbabwe?
Onion farming is a lucrative and profitable ventures in Zimbabwe. The cost of starting and the return on capital are attractive to practicing farmers.
Types Of Onions In Zimbabwe
Following are the types of onions in Zimbabwe;
- Cape Flat
- Pyramid
- Texas Grano
- Hojem
- Bon accord
- Dessex hybrid
Conclusion
So, that is all we have prepared for you on how to grow onions in Zimbabwe and all you need to know. If there are additional information you need to know and was not cover in this content, kindly notify via the comment section.

How do i dry onions so i can sell in profitable times. Can i dry them out side. Can i use tobacco barns to dry the onions. I wish for you to come to my farm in Nyazura to show me some tricks on how to grow and dry them and storage.
To dry onions for sale in profitable times, you should start by selecting onions that are mature, firm and free from any signs of disease or rot. Cut the onions into slices or cubes and spread them out on a drying tray in a single layer. Place the tray in a warm, dry and well-ventilated spot and keep it away from direct sunlight. Turn the onions regularly and use a fan to increase airflow if necessary. Once the onions are completely dry, store them in an airtight container in a cool, dark place.
It’s our pleasure this content is helping you out. You can get through to me via our official email address [email protected]
Also You can connect with us on Facebook by searching for agrolearner.com and liking and following our page